Photoshop tutorials
In this Photoshop tutorials post I'm going to explain how to enlarge your image without losing quality. I will describe how to duplicate the background layer.
Maximize Your Images with Minimal Visible Loss
Steps

- In a photo that you want to enlarge, Click Image.
- Click Image Size. The Image Size dialog appears showing the current size of the opened image. Make sure the Resample Image check box is selected.
- Double click in the Width box to highlight all the numbers.
- Type the desired width for the final printed image. The height automatically adjusts proportionally.
- Type 360 in the Resolution box.
- Click the Resample Image up-down arrow.
- Select Bicubic Sharper from the pop-up menu.
- Click OK. A Progress bar appears as the Photoshop processes the enlargement. The enlarged photo will then appear. Check the file size in the window frame.
- Click View.
- Click Rulers to turn the rulers on and see the new dimensions.
Duplicate the Background Layer
Steps

- Open image
- In the Layers palette, click and drag the background layer thumbnail over the New Layer icon and release the mouse. Photoshop places a duplicated Background layer above the original.
- Double click the Background copy name to highlight it.
- Type a new name
- Click the Visibility icon next to the original Background layer. The icon disappears but the image on the screen does not change.
Remove Red Eye
Steps
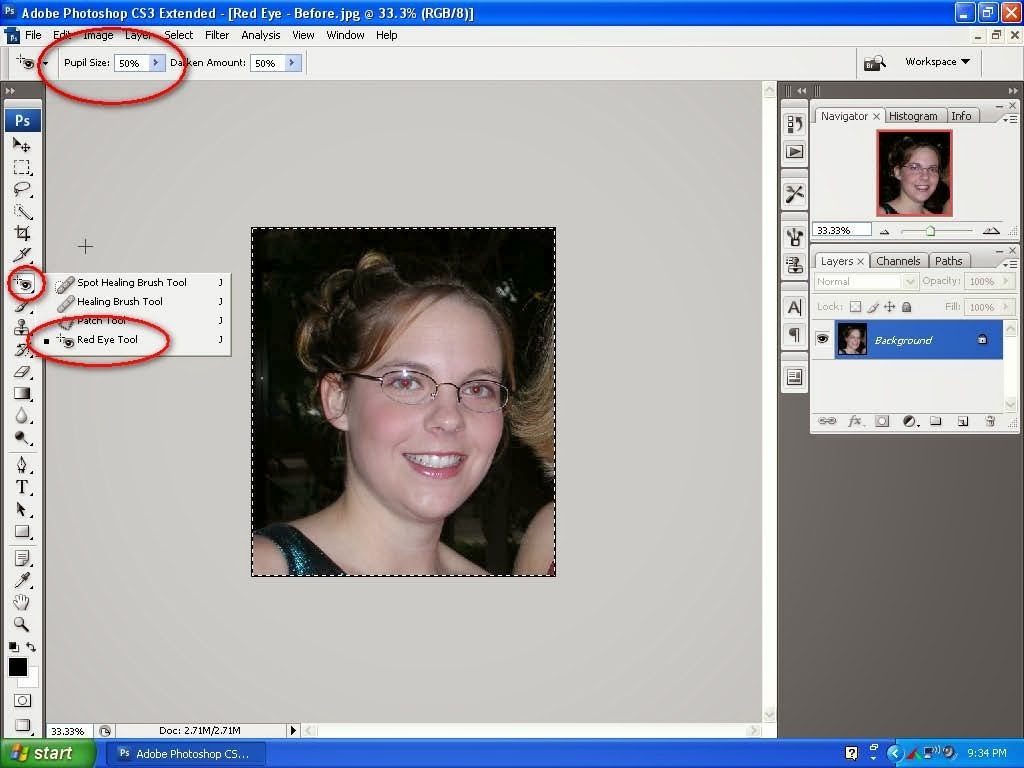
- Click the Zoom tool in Photoshop and zoom in to enlarge the red eyes on a photo.
- Click the Spot Healing Brush tool and hold the mouse button to reveal the pull-down menu.
- Click the Red Eye Tool. The Options bar changes to show the options for the Red Eye Tool.
- Double click in the Pupil Size data field in the Options bar and type the number 15.
- Double click in the Darken Amount data field in the Options bar and type the number 15.
- Click in the red area of one eye. Photoshop replaces the red with a neutral gray.
- Click in the red area of the other eye. Photoshop replaces the red with a neutral gray.
- Click the Zoom tool. The Options bar changes.
- Click Fit Screen to zoom out and see the entire image and a more natural looking eye color.


Remove Blemishes to Improve Skin Tone
Steps
- Click the Zoom tool.
- Click Resize Windows to Fit in the Options bar.
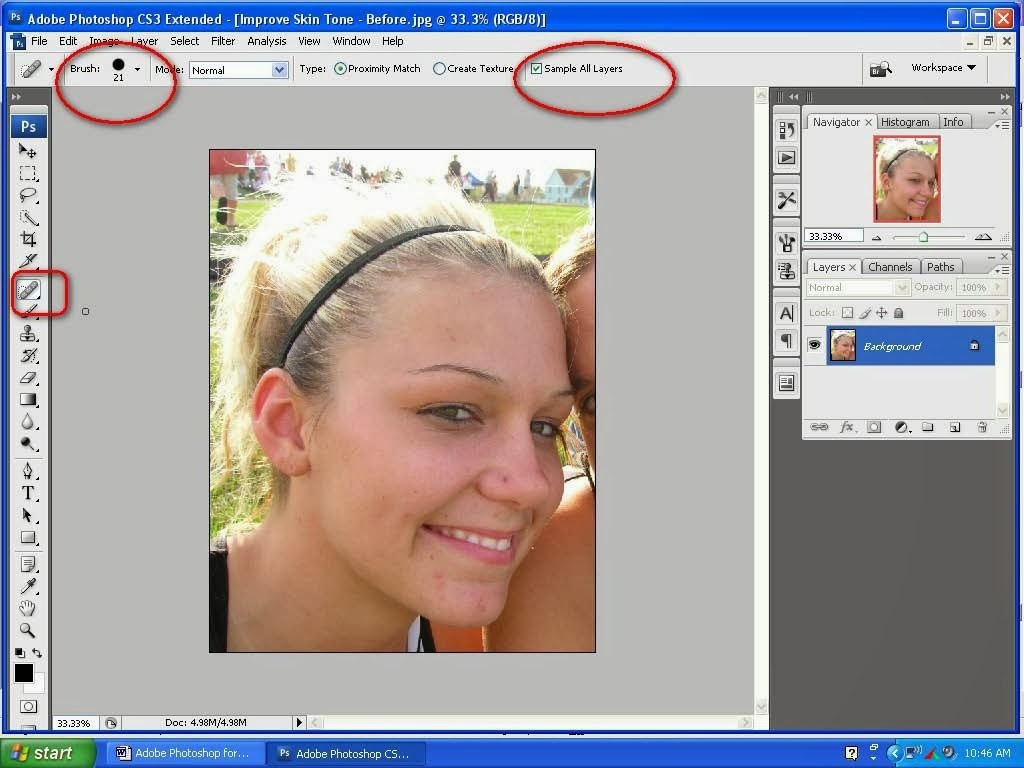
- Click and drag over the blemish areas to zoom in. Click the Spot Healing Brush.
- Click Sample All Layers in the Options bar.
- Click the New Layer icon in the Layers palette to add a new blank layer. A new layer is added in the Layers palette but the screen does not change.
- Click the Brush thumbnail in the Options bar to open the Brush Picker.
- Click and drag the Diameter slider to adjust the size of the brush. The brush size should be just larger than the blemish you want to remove.
- Click each of the worst blemishes of a similar size first. Photoshop removes the blemish blending the surrounding skin area.
- Click the New Layer icon in the Layers palette to add another blank layer.
- Repeat Steps 7 to 9, clicking the other blemishes. Layer 2 should be highlighted in the Layers palette.
- Click the Opacity expand arrow in the Layers palette.
- Drag the Opacity slider for Layer 2 to the left until the skin looks natural.


No comments:
Post a Comment