Photoshop tutorials
In this Photoshop tutorials post I'm going to explain how to create Photo-Filled Text and the process to create soft focus effect etc.
Photo-Filled Text
Steps
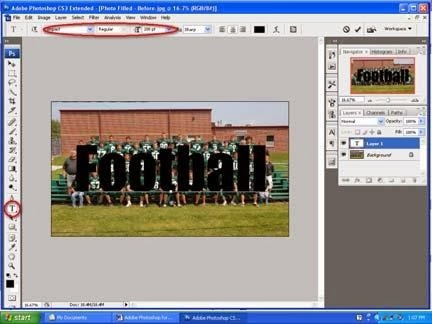
- Open a photograph, and click the Type tool.
- Select the Font family, style, and size in the Options bar.
- Click in the image and type the text.
- Press and hold Ctrl.
- Click and drag the transformation anchors to stretch the type.
- Click the Commit button in the Options bar.
- Click and drag the Background layer over the New Layer icon to duplicate it.
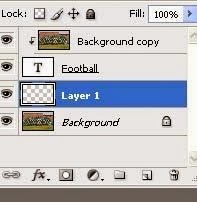
- Click and drag the Background Copy layer above the Type layer.
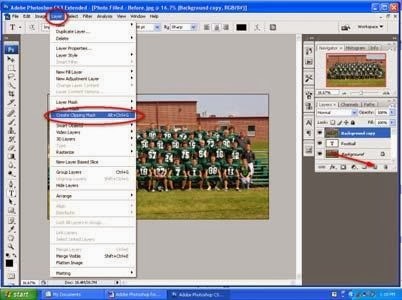
- Click Layer.
- Click Create Clipping Mask. The Background Copy layer is indented with an arrow in the Layers palette but the image does not change.
- Click the New Layer icon in the Layers palette to create a new blank layer named Layer
- Click and drag the new blank layer below the Type layer.
- Press D to reset the default colors.
- Click (Ctrl + Backspace) to fill the layer with white. The photo fills the letters on a white background.
- Click the Move tool.
- Click the Background Copy layer.
- Click and drag in the image to move the photo into position inside the letters.


Create Soft Focus Effect
Steps
- Click and drag the Background layer over the New Layer icon in the Layers palette.
- Click Filter > Blur > Gaussian Blur. The Gaussian Blur dialog appears.
- Move the dialog so you can see the image.
- Click and drag the Radius slider until the image is completely blurred.
- Set the Radium at 20 to 50 pixels for high-resolution photos or 6 to 20 pixels for low-resolution photos.
- Click OK. The image appears completely blurred.
- Click and drag the Opacity slider in the Layers palette to reduce the effect until the image appears to have a dreamy, soft focus.


Create a Dark-Edged Vignette Effect
Steps
- Click the Adjustment Layer icon in the Layers palette.
- Click Photo Filter. The Photo Filter dialog appears.
- Click the color thumbnail. The Color Picker appears.
- Click and select a dark brown or black.
- Click OK to close the Color Picker.
- Deselect the Preserve Luminosity check box.
- Click and drag the Density to a higher percentage if desired.
- Click OK to close the dialog. A dark filter covers the image.
- Click the layer mask thumbnail.
- Click the Rectangular Marquee tool.
- Click the Feather data field and type 100 for the hi-resolution photo.
- Click and drag a selection over the center of the image.
- Press D to set the foreground color to white.
- Press Backspace to fill the selection with black.
- Click (Ctrl + D) to deselect the marquee.


Give Color to a Black and White Photo
Steps
- Click and drag the Background layer over the New Layer icon to duplicate it.
- Click the Visibility icon next to the original Background layer to hide it.
- Press D to reset the foreground and background colors to the default black and white.
- Click the New Adjustment Layer in the Layers palette.
- Click the Channel Mixer. The Channel Mixer dialog appears.
- Click OK to close the dialog without making any changes. NOTE: Make sure the foreground color is still set to black; click the reverse Foreground and Background Color icon if necessary.
- Click the New Adjustment Layer in the Layers palette.
- Click Gradient Map. The Gradient Map dialog appears and the image behind it changes to grayscale.
- Click OK to close the dialog.
- Double-click the Channel Mixer Adjustment thumbnail in the Layers palette. The Channel Mixer dialog appears. Make sure the Preview check box is selected in the dialog.
- Click and drag the dialog to one side so you can see the image.
- Click and drag the sliders for each Source Channel to get the contrast you want.
- Click OK.
- Click Layer.
- Click Merge Visible. The top three layers merge in the Layers palette leaving only the Background copy layer in the grayscale and the Background layer in color.
- Click in the Visibility box by the original Background layer to make it visible.
- Click the Eraser tool.
- Click the Brush options to select a brush size.
- Click the Airbrush thumbnail in the Options menu.
- Double-click in the Opacity data field in the Options menu and type 20.
- Erase over the area to be colorized.
- Double-click in the Opacity data field in the Options menu and type 40.
- Click the Brush options and drag the slider to reduce the brush size.
- Erase over parts of the colored area to increase the color. The viewer’s attention is drawn to the perfect spot.


Straighten Crooked Scans
Steps
- Open a file with multiple scans.
- Click File Automate
- Click Crop and Straighten Photos. A Progress bar appears as Photoshop separates and crops each image in the file. Each image is opened in its own window.
- Click Window.
- Click Arrange.
- Click Tile Horizontally or Tile Vertically. Photoshop arranges the original scan and all the separate images on the screen.
- Click the Maximize button to view each image at full size.
Create a PDF Slide Show Presentation
Steps
- Open the images you want to use.
- Click File > Automate > PDF Presentation
- In the PDF Presentation dialog, click the Add Open Files check box. A list of open files appears in the window.
- In Output Options, select the Presentation option.
- Click Loop after Last Page.
- Click the Transition up-down arrow and select a transition style.
- Click Save. The Save dialog appears.
- Type a name for the PDF slide show.
- Click Save. The Save Adobe PDF dialog appears.
- Click the Adobe PDF Preset up-down arrow and select Smallest File Size.
- Click the View PDF after saving check box.
- Click save PDF. Photoshop creates the PDF file, and launches Acrobat or Adobe Reader. The PDF slide show begins. You can press esc to end the slide show.
This is the last one of four part basic Photoshop tutorials. I will post some advance Photoshop tutorials next-time. Write your opinion about this blog as comment.


No comments:
Post a Comment